
Training CNN with ImageNet and Caffe
This post is a tutorial to introduce how Convolutional Neural Network (CNN) works using ImageNet datasets and Caffe framework.
ImageNet is a large-scale hierarchical image database that mainly used by vision related research.
Caffe is one of the widely used deep learning framework. The performance is quite fast and this framework focuses on Computer Vision area.
now lets get started!
Install Caffe to your system:
Assumed you already did the prequisite step for your system, if you haven’t go here.
Steps:
> git clone https://github.com/BVLC/caffe.git
> cd caffe
> mkdir build
> cd build
> cmake ..
> make -j13 or make all
> make install
> make runtest
Data Preparation:
Download ImageNet 2012 data
First, you need to download the ImageNet 2012 Training data from here and put it under ‘caffe/data/ilsvrc12/’ root folder.
Then, download auxilaries, to do this you can use get_ilsvrc_aux.sh under ‘caffe/data/ilsvrc12/’ and run:
> sh get_ilsvrc_aux.shConvert data to lmdb
Now you have downloaded all data. Next, you need to convert your data to database system such as lmdb or leveldb.
To do this modify the path inside create_imagenet.sh and make_imagenet_mean.sh file under ‘caffe/examples/imagenet/’.
run following to convert data to lmdb:
> sh create_imagenet.shThen, run this to create mean file:
> sh make_imagenet_mean.shTraining CNN Models:
Setting up the prototxt (model)
In order to train, you need to choose a model first, for example below is AlexNet model.
AlexNet is one of the well-known model that created by Krizhevsky on 2012.
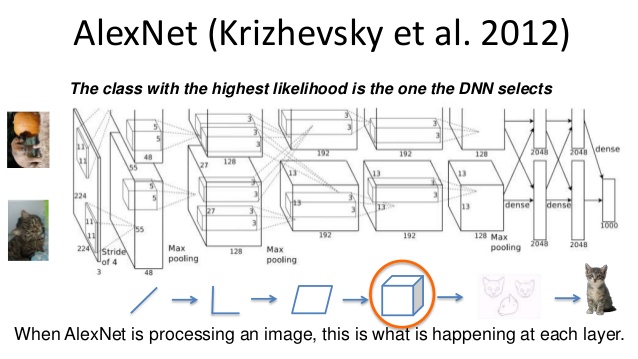 (Image Source : Deep Learning with Python-PyData Seattle 2015)
Prototxt is a configuration file that Caffe use to define a networks(models) and optimizers(solver).
Models
You can refer to train_val.prototxt example file under ‘caffe/models/bvlc_alexnet/’.
It looks like below:
name: "AlexNet"
layer {
  name: "data"
  type: "Data"
  top: "data"
  top: "label"
  include {
    phase: TRAIN
  }
  transform_param {
    mirror: true # to do data augmentation (mirror)
    crop_size: 227
    mean_file: "data/ilsvrc12/imagenet_mean.binaryproto" # path to mean proto file
  }
  data_param {
    source: "examples/imagenet/ilsvrc12_train_lmdb" # path to training data
    batch_size: 256 # number of samples data that grouped into one mini-batch
    backend: LMDB
  }
}
layer {
  name: "data"
  type: "Data"
  top: "data"
  top: "label"
  include {
    phase: TEST
  }
  transform_param {
    mirror: false
    crop_size: 227
    mean_file: "data/ilsvrc12/imagenet_mean.binaryproto"
  }
  data_param {
    source: "data/val_lmdb" # path to validation data
    batch_size: 50
    backend: LMDB
  }
}
...
...
layer {
  name: "fc8"
  type: "InnerProduct"
  bottom: "fc7"
  top: "fc8"
  param {
    lr_mult: 1
    decay_mult: 1
  }
  param {
    lr_mult: 2
    decay_mult: 0
  }
  inner_product_param {
    num_output: 1000 # number of classes (ImageNet 2012 has 1000 classes)
    weight_filler {
      type: "gaussian"
      std: 0.01
    }
    bias_filler {
      type: "constant"
      value: 0
    }
  }
}
layer {
  name: "accuracy"
  type: "Accuracy"
  bottom: "fc8"
  bottom: "label"
  top: "accuracy"
  include {
    phase: TEST
  }
}
layer {
  name: "loss"
  type: "SoftmaxWithLoss"
  bottom: "fc8"
  bottom: "label"
  top: "loss"
}BTW, just in case you want to measure Top-5 accuracy you can add following line to above train_val.prototxt:
layer{
  name: "accuracy/top5"
  type: "Accuracy"
  bottom: "fc8"
  bottom: "label"
  top: "accuracy@5"
  include {
    phase: TEST
  }
  accuracy_param{
    top_k: 5
  }
}
Optimizers : Doc.
You can refer to solver.prototxt example file under ‘caffe/models/bvlc_alexnet/’.
net: "models/bvlc_alexnet/train_val.prototxt" # path to your models(network definition)
test_iter: 1000 # number of test iterations occured per "test_interval" | = (number of data / batch size).
test_interval: 1000 # how often test phase will be executed
base_lr: 0.01 # learning rate
lr_policy: "step" # means to drop learning rate based on gamma
gamma: 0.1 # Adjust learning rate every "step"
stepsize: 100000 # how often to make a step
display: 20 # how often to print out training loss
max_iter: 450000
momentum: 0.9 # weights defender percentage
weight_decay: 0.0005
snapshot: 10000 # number of snapshots
snapshot_prefix: "models/bvlc_alexnet/caffe_alexnet_train" # path to save your results (trained model)
solver_mode: GPU # Change to 'CPU' if you want to use CPU power
Let’s Train!
Training from scratch
Run command below under ‘caffe’ root.
> ./build/tools/caffe train --solver=models/bvlc_alexnet/solver.prototxt --gpu=0 2>&1 | tee output.logNote: --gpu to choose your gpu id, and 2>&1 | tee output.log to produce your output report in log file format.
Resume your training
In case your training die halfway (e.g. stop at 60,000 iterations) you can resummon it by:
> ./build/tools/caffe train --solver=models/bvlc_alexnet/solver.prototxt --snapshot=models/bvlc_alexnet/caffe_alexnet_train_iter_60000.solverstate --gpu=0 2>&1 | tee output.logFinetune (train with existing model)
For example if you already have model in your hand and you want to refine it:
> ./build/tools/caffe train --solver=models/bvlc_alexnet/train_val.prototxt --weights=models/bvlc_alexnet/bvlc_caffe_alexnet.caffemodel --gpu=0 2>&1 | tee output.logLet’s test
To deploy:
> ./build/tools/caffe test --model=models/bvlc_alexnet/solver.prototxt --weights=models/bvlc_alexnet/caffe_alexnet_train_iter_450000.caffemodel --gpu=0 2>&1 | tee output_test.logPhew~~ Congratulations! you just finished train CNN!.